##

Go to Blogger edit html and find these sentences.Now replace these sentences with your own descriptions.

This is default featured slide 2 title

All Type Computer Laptop Mobile Trainging And Repairing.

All Type Computer Laptop Mobile Trainging And Repairing.

Go to Blogger edit html and find these sentences.Now replace these sentences with your own descriptions.

This is default featured slide 4 title

Go to Blogger edit html and find these sentences.Now replace these sentences with your own descriptions.

This is default featured slide 5 title

Go to Blogger edit html and find these sentences.Now replace these sentences with your own descriptions.

How Computer Works?

  HOW COMPUTER WORKS

It is interesting to know what is inside a computer a computer . Let us know then internal parts of a computer.

👉 Parts of the Computer   :

 1.   Microprocessor  

2.   Power supply

3.   Modem

4.   Memory

5.   Hard Disk

6.   Motherboard


1.     Microprocessor :

                    You must have heard about Intel Pentium 4, Dual Core , i5 , i7 processors. These are called microprocessors. Microprocessor is the brain of the computer, where actual processing is done.


2.     Power supply   :

                       This unit takes Alternating Current (AC) which is available in electric points, and converts it into various volts of Direct Current (DC) on which electronic goods run. 

3.    Modem :

                            Modem is a device that converts computer' s Digits data into Analog data which can travel through telephone lines. It is used to connect the computer to the internet.

Microsoft word in Hindi ...


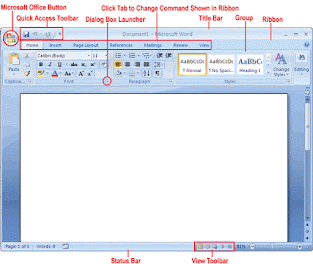
                          Microsoft word

एम एस वर्ड का परिचय :Introduction of MS Word:

एम एस वर्ड माइक्रोसॉफ्ट कार्पोरेशन द्वारा तैयार किया गया एक एप्लीकेशन सॉफ्टवेयर है। इसके द्वारा ऑफिशल कार्यो को आसानी से कर सकते है। शुरू - शुरू में यह प्रोग्राम एम एस डांस के वातावरण में वर्ड स्टार के नाम से चलता था। जिसमे सिमित सुविधाएं प्रदान की गई थी। एम एस पेंट में लेटर टाइपिंग या अन्य प्रकार के साथ -साथ थोड़ा बहुत पिक्चर भी डिज़ाइन कर सकते है।
एम एस वर्ड द्वारा बनाई गई फाइल का एक्सटेंशन नाम .doc होता है।
यह एक बड़ा वर्ड प्रोसेसिंग प्रोग्राम है। जिसमे टेक्स्ट की फॉर्मेटिंग सरल तरीके से कर सकते है।
इसके कई वर्शन है जो इस प्रकार है


  • MS Word   97
  • MS Word   xp
  • MS Word   2000
  • MS Word   2002
  • MS Word   2003
  • MS Word   2005
  • MS Word   2007
  • MS Word   2010
  • MS Word   2016

    1.  इसमें डॉक्युमेंट फाइल का निर्माण होता है। 
    2.  इसमें पासवर्ड देने लगाने की सुविधा दी गई है। जिसके प्रयोग करके हम बनाई जा रही फाइल को पासवर्ड से लॉक कर सकते है। 
    3. इसमें कई डिज़ाइन में हम टेबल का निर्माण कर सकते है। और बनाये गए टेबल की फॉर्मेटिंग भी कर सकते है। 
    4. इसमें पेजो की संख्या अधिक होने के कार
    5. ण हम लम्बी से लम्बी फाइल का निर्माण कर सकते है। 
    6. इसमें टेक्स्ट को कई डिज़ाइन में लिख सकते है। 
    7. इसमें कई प्रकार की आकृति में ऑब्जेक्ट बना सकते है। और उसमे विभिन्न प्रकार के पिक्चर एवं कलर मिक्स कर सकते है। 
    8. इसमें हम बांये गए ऑब्जेक्ट पर सैडो इफ़ेक्ट दे लगा सकते है। 
    9. इसमें हम पेज के चारो तरफ फूल एवं पत्तियों का बॉर्डर लगा सकते .

      1. New                                            Ctrl+ N
      2. Open                                           Ctrl +O
      3. Save                                            Ctrl+ S
      4. Print                                            Ctrl+ P
      5. Print preview                              F12
      6. spelling and Grammar                F7
      7. Research                                     ALT +Click
      8. Cut                                              CTRL+X
      9. Copy                                           CTRL+C
      10. Paste                                           CTRL+V
      11. Format Painter                           (CTRL +Shift+ C , CTRL +Shift                                                                                                           +V)
      12. Undo                                           CTRL+Z
      13. Redo                                           CTRL+Y
      14. Insert hyperlink                          CTRL+K
      15. Table and Border                        
      16. Insert Table
      17. Insert Microsoft worksheet
      18. Column
      19. Drawing
      यह भी पढ़े ... एम एस पॉवरपॉइंट 

      New:

      इस ऑप्शन का प्रयोग एम एस वर्ड में एक नया ब्लैंक डॉक्यूमेंट लाने के लिए किया जाता है।

      Open:

      इस ऑप्शन का प्रयोग बनाये गए डॉक्यूमेंट में ओपन करने के किया जाता है।

      Save:

      इस ऑप्शन का प्रयोग एम एस वर्ड में बनाये जा रहे डॉक्यूमेंट को सेव करने के लिए किया जाता है।

      Print:

      इस ऑप्शन का प्रयोग एम एस वर्ड में बनाये जा रहे डॉक्यूमेंट को प्रिंट करने के लिए किया  जाता है।


      Print preview:

      इस ऑप्शन का प्रयोग बांये जा रहे डॉक्यूमेंट को प्रिंट करने से पहले देखने के लिए किया जाता है। कि पेज पर मैटर कहा तथा किस प्रकार प्रिंट होगा है.

      Spelling and Grammar:

      इस ऑप्शन का   प्रयोग पेज पर गलत लिखे जा रहे वर्ड की जाँच करने के लिए किया जाता है।


      Research:

      इस ऑप्शन का प्रयोग पेज पर लिखे गए वर्ड से रिलेटेड वर्ड को लाने के लिए किया जाता है।


      Cut:

      इस ऑप्शन का यूज़ सेलेक्ट किये गए टेक्स्ट ,ऑब्जेक्ट ,या पिक्चर को कट करने के लिए किया जाता है।
      जिससे सेलेक्ट किया गया मैटर पेज से हट जाता है।
      इसकी शॉर्टकट कीय   CTRL + X होती है।


      Copy:

      इस ऑप्शन का यूज़ सेलेक्ट किये गए टेक्स्ट ,ऑब्जेक्ट ,या पिक्चर को कॉपी  करने के लिए किया जाता है।
       इसकी शॉर्टकट कीय   CTRL + C होती है।


      Paste:

      इस ऑप्शन का प्रयोग कट अथवा कॉपी किये गए मैटर को पुनः पेज पर लाने के लिए किया जाता है।
       इसकी शॉर्टकट कीय   CTRL + V होती है।

      Format Painter:

      इस ऑप्शन का प्रयोग एक टेस्ट पर दी गई फॉर्मेटिंग को दूसरे पर अप्लाई करने के लिए किया जाता है।


      Insert Hyperlink:

      इस ऑप्शन का प्रयोग करने पर इसका एक बॉक्स डिस्प्ले होता है जिसमे दिए गए ऑप्शन के द्वारा किसी दूसरे फाइल से लिंक बना सकते है।


      Table and Border:

      इस ऑप्शन का प्रयोग करने पर इसका एक बॉक्स डिस्प्ले होता है जिस मे स्थित ऑप्शन के द्वारा अपनी इच्छा अनुसार टेबल का निर्माण कर सकते है।

      Insert Table:

      इस ऑप्शन का प्रयोग रो और कॉलम के आधार पार टेबल बनाने के लिए किया जाता है।

      Insert Microsoft excel worksheet:

      इस ऑप्शन का प्रयोग एम एस एक्सेल की शीट को एम एस वर्ड के पेज पर लेन के लिए किया जाता है।

      Column:

      इस ऑप्शन के द्वारा एम एस वर्ड के पेज को कई कॉलम में विभाजित कर सकते है।


      Drawing:

      इस ऑप्शन का प्रयोग ड्राइंग टूलबार को  ऑन अथवा ऑफ करने के लिए किया जाता है।

What is Microsoft Power Point?


                Intro to Microsoft PowerPoint


                        What is Microsoft PowerPoint? 

Microsoft PowerPoint, widely known as PPT is a presentation creation tool used not only by the big companies in the market but also by students. You can design slides with a blend of text, images, shapes, animations, audio, and much more. In the end, all you gotta do is pop your presentation onto the big screen so that it is displayed to the audience or you can even design it as a personal document for yourself. Microsoft Company puts it this way, “PowerPoint is a slideshow presentation program that’s part of the Microsoft Office suite of tools. PowerPoint makes it easy to create, collaborate, and present your ideas in dynamic, visually compelling ways.” Microsoft PowerPoint is a professional presentation program that allows the user to create "presentation slides" that can be displayed on the computer screen or through a projector that is plugged into the computer. A PowerPoint presentation is a good way to convey pieces of information, usually in the form of an outline, to a large audience. Generally, PowerPoint presentations are appealing to users because they are easy to create and edit and generally small enough to fit onto a CD or a USB Jump Drive. 

Therefore, a user does not have to carry around any slides or slide projector, and, if necessary, can make any last-minute changes to the presentation.

 Where do you see PowerPoint in most use:

 Business Presentations: To introduction of products/services/offerings 

 Sales and Marketing Department: Sales and marketing materials are mostly designed on PowerPoint.

 Finance Department: To display budgets and yearly projections. 

 Data Presentation: One can generate reports, create diagrams, and derive graphs or charts with massive data. 

 Stationary Material: One can design/edit certificates, calendars 

 Educational Slideshows: To deliver a classroom lecture 

 Event Presentations: It could be for any family functions from weddings and anniversaries to just a family reunion. 

 Personal Visuals: A gallery for family tips Microsoft PowerPoint Components.

          Microsoft PowerPoint Components

 Before you get started with Microsoft PowerPoint (commonly referred to as simply PowerPoint), you will need to locate and open it from the computer. It may be on your desktop. From the computer desktop: 

1. Double-click on the MS PowerPoint icon 

What is Microsoft Access ?

 A Basic introduction to Microsoft Access 


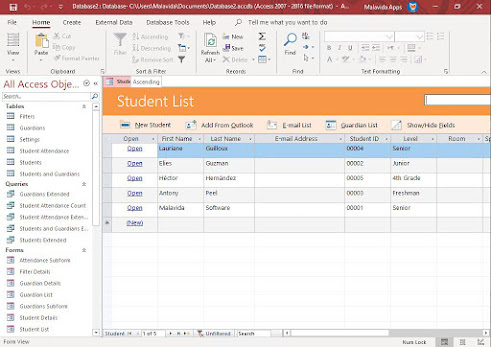
MS Access is a database management tool that enables one to have good command of data collected. The programmed enables one to retrieve, sort, summarize and report results speedily and effectively. It can combine data from various files through creating relationships, and can make data entry more efficient and accurate.

 Microsoft Access (MS Access) enables one to manage all important information from a single database file. Within the file, one can use:

 • Tables to store your data.
 • Queries to find and retrieve specific data of interest.
 • Forms to view, add, and update data in tables.
 • Reports to analyze or print data in a specific layout. 
 • Data access pages to view or update, the data. 

In MS Access, data is stored once in one table, but can be viewed from multiple locations. When the data is updated in a Table, Query or Form, it is automatically updated everywhere it appears.


Establishment of MS Access database

 All MS Access databases files are saved with extension .m d b.

 A database should have a separate table for every major subject, such as pedigree records, Production data or Treatment information. Data should not be duplicated in multiple tables.

 Microsoft Access provides three methods to create a database
 „ Database Wizard (though easy, the wizard offers limited options to customize the database)
 „ Using a template (This method works best if one can find and use a template that closely matches the specific requirements)
 „ Creating a database directly (This is the most flexible method, but it requires one to define each database element separately). 

Create a new Access database 
 
After creating a new database, this should be saved by the name which reflects the content of the database. Upon saving the database, the MS Access database window opens with the Tables tab-active (i .e in such a way that the next activity should be to create a table).


 Creating a table 

Tables are the data storage facilities in MS Access. Each table contains rows called records and columns called fields. 

A record is a collection of facts about a particular animal or event. Each record in a table should be unique. To distinguish one record from another, tables can contain a primary key field.

 A field is a single kind of fact that may apply to each animal or event. For example, date of birth is a field in a table on animal information.

 The fields in a database have settings that determine the
- type of data they can store, 
- how the data is displayed,
- what can be done with the data.
 For example, field settings can ensure that birth dates are entered with two numbers for the month, two numbers for the day, four numbers for the year, and slashes in between: 01/04/2006.

 One important setting for fields is the data type, which could be a number, text, currency, and date/time. The data type limits and describes the kind of information in the field. The data type also determines the actions one can perform on a field and how much memory the data will use. 

Fields also have properties that control the details of information inside them, including a character length, a default value, and a validation rule that makes sure the data meets certain criteria.

 Tables may be created by either:
              - Table wizard,    
              - Design view 
              - Entering data in a spreadsheet. 

 Creating Tables using design view 

Creation of a table by design view is a user customized way of making data storage tables. Each field in the design view of a table corresponds to a column in the datasheet view of a table. 
Designing a table involves:

                 - Entering unique names of the columns of the table in the “field name” column of the design view. Names of fields and objects in Microsoft Access can be up to 64 characters long. They can include any combination of letters, numbers, spaces, and special characters except a period (.), an exclamation point (!), an accent grave (`), and brackets ([ ]). They also can't begin with leading spaces

                - In the Data Type column, declare the type of data that will be entered in that column. The default is Text; or click in the Data Type column, click the arrow, and select the data type.

                - In the lower portion of the window Field properties, can be further specified. Microsoft Access allows one to distinguish between two kinds of blank values: Null values and MS-Access Basic 3 zero-length strings The Required property determines whether users can leave a field blank, resulting in a Null value. The Allow Zero Length property determines whether Text or Memo fields can contain a zero-length string. 

               - Define a Primary Key field (You don't have to define a primary key, but it's usually a good idea. If you don't define a primary key, Microsoft Access asks if you want Access to create one for you when you save the table) 

                 - Save the table by a name of your choice, (related to the information the table)

                 - Finally, close the design view to return to the database window where the columns of the table that you have just created are displayed .

Note:

To insert new fields within the table, in design view, click in the row below where you want to add the field, and then click Insert Rows on the toolbar. 

To add the field to the end of the table, click in the first blank row.

To change from one view to another, make a selection on the View menu or click the arrow next to the View button and choose from the list that appears. 

To view, enter, and change data easily and directly in a table, create a ‘form’

Creating data entry forms 

A form is a type of a database object that is primarily used to enter or display data in a database. Most forms are bound to one or more tables and queries in the database. A form's record source refers to the fields in the underlying tables and queries. 

A form:
                    - Focuses on one record at a time 
                    - Can display fields from more than one table 
                    - Can also display pictures and other objects 
                    - Can contain a button that prints, opens other objects, or otherwise automates tasks 

Data entry forms can be created either using a form wizard or in the design view. Once a table with fields is available, it is easy to create a form using the wizard:

             o Click on the forms tab
             o Double click on the create form by using a wizard. 
             o This will lead you through a series of steps until you finish creating the form. 

The form created is linked to the table and information entered in the fields of the form is stored in the table. 
A form need not contain all the fields from each of the tables or queries that it is based on. 
 
 When you open a form, Microsoft Access retrieves the data from one or more tables, and displays it on the screen with the chosen layout in the Form Wizard, or with the layout that you created on your own in design view.

Queries  

A query is a derived item in the database meant to answer specific questions that relate to the information in the database. Queries are handy during data processing.

 To find and retrieve just the data that meets conditions that you specify, including data from multiple tables, create a query. A query can also update or delete multiple records at the same time, and perform predefined or custom calculations on your data. 

A query requests data from the database. At its simplest, a query merely fetches all data from a single table. But as you create more complex (and more typical) queries, you can assemble exactly the data you want (i.e. unique sets of data that you require at any given time). Queries can also be used to execute mathematical and logical functions to obtain certain information in the database.

 Queries are derived from and linked to tables or other queries. (Due to these linkages, they tend to largely inflate the size of the database and should thus only be used to execute the intended functions, and stored only if updated information is to be retrieved) 

There are various types of queries for different uses:

               o Select queries- used for extracting specific information from a large multi-information                                        table. They can also be helpful in merging related information from different tables. 
              o Make-Table queries- used for making sub tables from the main table(s) and queries. 
              o Update queries- important in adding information in the fields of a Table.
              o Append queries- used to copy records from one table/ query to another.
              o Delete query- to PERMANENTLY remove unwanted content from the table. 

NOTE:
          delete query should not be used unless one surely will not require the information to be deleted.

 To run a simple Select query: In the Database window, click Queries under Objects. Click the query you want to open. Click Open on the Database window toolbar. 

 Caution: It's a good idea to make a copy of the data you are changing or moving in an action query, in case you need to restore the data to its original state after running the action query 

In Design view, 

- Choose the tables or existing queries that contain the fields to use 
- Select and drag those fields to a grid (The fields can come from just one table, or from multiple tables, the fields specified for a query control the data that the query retrieves) 
- Specify criteria and other settings, such as whether to sort the results

 ( To test a new query in Design view. Just click the Run button on the Query Design toolbar. This will switch you to the results view. 

 If you don't see the results you want, click the Design button to return to Design view.

  Note: 
          To stop a query in progress (after you start it), press “CTRL+BREAK”


                                          Thank you !                                                                                                                                                                                                                                                                                                                                                                                                                                                                                                                

What is Microsoft Excel ?


What is Microsoft Excel?

Microsoft Excel is a spreadsheet program used to record and analyze numerical and statistical data. Microsoft Excel provides multiple features to perform various operations like calculations, pivot tables, graph tools, macro programming, etc. It is compatible with multiple OS like Windows, macOS, Android and iOS.

A Excel spreadsheet can be understood as a collection of columns and rows that form a table. Alphabetical letters are usually assigned to columns, and numbers are usually assigned to rows. The point where a column and a row meet is called a cell. The address of a cell is given by the letter representing the column and the number representing a row.

Why Should I Learn Microsoft Excel?

We all deal with numbers in one way or the other. We all have daily expenses which we pay for from the monthly income that we earn. For one to spend wisely, they will need to know their income vs. expenditure. Microsoft Excel comes in handy when we want to record, analyze and store such numeric data. Let's illustrate this using the following image.

Where can I get Microsoft Excel?

There are number of ways in which you can get Microsoft Excel. You can buy it from a hardware computer shop that also sells software. Microsoft Excel is part of the Microsoft Office suite of programs. Alternatively, you can download it from the Microsoft website but you will have to buy the license key.

In this Microsoft Excel tutorial, we are going to cover the following topics about MS Excel.

  • How to Open Microsoft Excel?
  • Understanding the Ribbon
  • Understanding the worksheet
  • Customization Microsoft Excel Environment
  • Important Excel shortcuts

How to Open Microsoft Excel?

Running Excel is not different from running any other Windows program. If you are running Windows with a GUI like (Windows XP, Vista, and 7) follow the following steps.

  • Click on start menu
  • Point to all programs
  • Point to Microsoft Excel
  • Click on Microsoft Excel

Alternatively, you can also open it from the start menu if it has been added there. You can also open it from the desktop shortcut if you have created one.

For this tutorial, we will be working with Windows 8.1 and Microsoft Excel 2013. Follow the following steps to run Excel on Windows 8.1

  • Click on start menu
  • Search for Excel N.B. even before you even typing, all programs starting with what you have typed will be listed.
  • Click on Microsoft Excel

    Understanding the Ribbon

    The ribbon provides shortcuts to commands in Excel. A command is an action that the user performs. An example of a command is creating a new document, printing a documenting, etc. The image below shows the ribbon used in Excel 2013.

    Ribbon components explained

    Ribbon start button - it is used to access commands i.e. creating new documents, saving existing work, printing, accessing the options for customizing Excel, etc.

    Ribbon tabs – the tabs are used to group similar commands together. The home tab is used for basic commands such as formatting the data to make it more presentable, sorting and finding specific data within the spreadsheet.

    Ribbon bar – the bars are used to group similar commands together. As an example, the Alignment ribbon bar is used to group all the commands that are used to align data together.

    Understanding the worksheet (Rows and Columns, Sheets, Workbooks)

    A worksheet is a collection of rows and columns. When a row and a column meet, they form a cell. Cells are used to record data. Each cell is uniquely identified using a cell address. Columns are usually labelled with letters while rows are usually numbers.

    A workbook is a collection of worksheets. By default, a workbook has three cells in Excel. You can delete or add more sheets to suit your requirements. By default, the sheets are named Sheet1, Sheet2 and so on and so forth. You can rename the sheet names to more meaningful names i.e. Daily Expenses, Monthly Budget, etc.

    Customization Microsoft Excel Environment

    Personally I like the black color, so my excel theme looks blackish. Your favorite color could be blue, and you too can make your theme color look blue-like. If you are not a programmer, you may not want to include ribbon tabs i.e. developer. All this is made possible via customizations. In this sub-section, we are going to look at;

    • Customization the ribbon
    • Setting the color theme
    • Settings for formulas
    • Proofing settings
    • Save settings
    • Click on the ribbon start button
    • Select options from the drop down menu. You should be able to see an Excel Options dialog window
    • Select the customize ribbon option from the left-hand side panel as shown below
    • On your right-hand side, remove the check marks from the tabs that you do not wish to see on the ribbon. For this example, we have removed Page Layout, Review, and View tab.
    • Click on the "OK" button when you are done.

  • Adding custom tabs to the ribbon

    1. Right click on the ribbon and select Customize the Ribbon. The dialogue window shown above will appear
    2. Click on new tab button as illustrated in the animated image below
    3. Select the newly created tab
    4. Click on Rename button
    5. Give it a name of Guru99
    6. Select the New Group (Custom) under Guru99 tab as shown in the image below
    7. Click on Rename button and give it a name of My Commands
    8. Let's now add commands to my ribbon bar
    9. The commands are listed on the middle panel
    10. Select All chart types command and click on Add button
    11. Click on OK
                                                                                                                                                                                                                                                                                                                                                                                                                Thank you !

what is computer ? in hindi

कंप्यूटर क्या है - Computer in Hindi

सबसे पहले कंप्यूटर का परिचय जान लेते हैं कंप्यूटर शब्द अंग्रेजी के "Compute" शब्द से बना है, जिसका अर्थ है "गणना", करना होता है इसीलिए इसे गणक या संगणक या अभिकलक यंत्र भी कहा जाता है और इसका अविष्‍कार Calculation करने के लिये हुआ था सीधी भाषा मेंं कंप्‍यूटर Calculation करने वाली मशीन थी . 


कम्प्यूटर का पूरा नाम क्या है – Computer Full Form in Hindi

कम्प्यूटर बहु-उपयोगी मशीन होने के कारण आज तक भी इसको एक परिभाषा में नही बाँध पाँए है. इसी कड़ी में कम्प्यूटर का पूरा नाम भी चर्चित रहता है. जिसकी अलग लोगों और संस्थाओं ने अपने अनुभव के आधार पर भिन्न-भिन्न व्याख्या की है. लेकिन, इनमे से कोई भी Standard Full Form नही है. मैंने आपके लिए एक कम्प्यूटर की फुल फॉर्म नीचे बताई है. जो काफी लोकप्रिय और अर्थपूर्ण है.

C – Commonly
O – Operating
M – Machine
P – Particularly
U – Used in
T – Technology
E – Education and
R – Research

अर्थात Commonly Operating Machine Particularly Used in Technology Education and Research.

1. System Unit

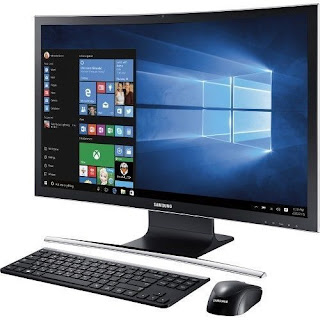
System Unit एक बक्सा होता है जिसमें Computer को अपना कार्य करने के लिए आवश्यक यंत्र लगे होते है. सिस्टम युनिट को CPU   भी कहा जाता है. इसमें मदरबोर्ड, प्रोसेसर, हार्ड डिस्क आदि यंत्र होते है जो Computer को कार्य करने लायक बनाते है. इसे Computer Case भी कहते है.

2. Monitor

Monitor एक आउटपुट उपकरण है जो हमें दिए गए निर्देशों के परिणामों को दिखाता है. यह बिल्कुल टीवी के जैसा होता है. वर्तमान में मॉनिटरो की जगह एल सी डी एवं एल ई डी ने ले ली है.

3. Keyboard

Keyboard एक इनपुट उपकरण है जो हमें Computer को निर्देश देने के लिए होता है. इसकी मदद से ही Computer को वांछित आंकडे एवं निर्देश दिए जाते है. इसमे विभिन्न प्रकार की कुंजिया (keys) होती है इन्ही के द्वारा आंकडे एवं निर्देश Computer तक पहुंचाए जाते है. आप यहाँ से Keyboard का उपयोग  करना सीख सकते है.

4. Mouse

Mouse भी एक इनपुट उपकरण है जो Computer को निर्देश देने के लिए होता है. हम इसके द्वारा Computer में उपलब्ध प्रोग्राम को चुनते है. आप यहाँ से Mouse का उपयोग  करना सीख सकते है.

5. Speakers

Speakers आउटपुट उपकरण है जो हमें Computer से आवाज को सुनने में मदद करते है. इन्ही के द्वारा हमें गानों, फिल्मों, प्रोग्रामों तथा खेलों आदि में उपलब्ध ध्वनी सुनाई देती है.

6. Printer

Printer भी एक आउटपुट उपकरण है जो Computer द्वारा विश्लेषित सूचनाओं को कागज पर प्राप्त करने के लिए होता है. कागज पर प्राप्त होने वाली सूचनाओं को ‘हार्डकॉपी‘ भी कहते है. और इसके उलट जो सूचनाए Computer में ही रक्षित रहती है उन्हे ‘सॉफ्टकॉपी’ कहते है.


कम्प्यूटर की विशेषताएं – Characteristics of Computer in Hindi

कम्प्यूटर ने हम इंसानों द्वारा किए जाने वाले अधिकतर कामों पर कब्जा कर लिया हैं और इंसान को उसकी क्षमता से अधिक कार्य-क्षमता प्रदान की हैं. यह सब इस मशीन के खास गुणों के कारण संभव हैं. तभी हम इंसान कम्प्यूटर को अपने जीवन का हिस्सा बना रहे हैं. कम्प्यूटर की कुछ खास विशेषताएँ निम्न हैं.

1. गति – Speed

  1. कम्प्यूटर बहुत तेज गति से कार्य करता हैं.
  2. यह लाखों निर्देशों को केवल एक सैकण्ड में ही संसाधित कर सकता हैं.
  3. इसकी डाटा संसाधित करने की गति को माइक्रोसैकण्ड (10–6), नैनोसैकण्ड (10-9) तथा पिकोसैकण्ड (10-12) में मापा जाता हैं.
  4. आमतौर पर प्रोसेसर की एक युनिट की गति दसियों लाख निर्देश प्रति सैकण्ड यानि MIPS (Millions of Instructions Per Second)
  5. इस मशीन का निर्माण ही तीव्र गति से कार्य करने के लिए किया गया हैं.

2. शुद्धता – Accuracy

  1. कम्प्यूटर GIGO (Garbage in Garbage Out) सिद्धांत पर कार्य करता हैं.
  2. इसके द्वारा उत्पादित परिणाम त्रुटिहीन रहते हैं. अगर किसी परिणाम में कोई त्रुटि आती हैं तो वह इंसानी हस्तक्षेप तथा प्रविष्ट निर्देशों के आधार पर होती हैं.
  3. इसके परिणामों की शुद्धता मानव परिणामों की तुलना में बहुत ज्यादा होती हैं.

3. परिश्रमी – Diligence

  1. कम्प्यूटर एक थकान मुक्त और मेहनती मशीन हैं.
  2. यह बिना रुके, थके और बोरियत माने बगैर अपना कार्य सुचारु रूप से समान शुद्धता के साथ कर सकता हैं.
  3. यह पहले और आखिरी निर्देश को समान एकाग्रता, ध्यान, मेहनत और शुद्धता से पूरा करता हैं.

4. बहुप्रतिभा – Versatility

  1. कम्प्यूटर एक बहु-उद्देश्य मशीन हैं.
  2. यह गणना करने के अलावा अनेक उपयोगी कार्य करने में सक्षम होता हैं.
  3. इसके द्वारा हम टाइपिंग, दस्तावेज, रिपोर्ट, ग्राफिक, विडियों, ईमेल आदि सभी जरूरी काम कर सकते

5. स्वचालित – Automation

  1. यह एक स्वचालित मशीन भी हैं.
  2. यह बहुत सारे कार्यों को बिना इंसानी हस्तक्षेप के पूरा कर सकता हैं.
  3. स्वचालितता इसकी बहुत बडी खूबी हैं.

6. संप्रेषण – Communication

  1. एक कम्प्यूटर मशीन अन्य इलेक्ट्रॉनिक डिवाइसों से भी बात-चीत कर सकता हैं.
  2. यह नेटवर्क के जरीए अपना डाटा का आदान-प्रदान एक-दूसरे को आसानी से कर सकते हैं.

7. भंडारण क्षमता – Storage Capacity

  1. कम्प्यूटर में बहुत विशाल मेमोरी होती हैं.
  2. कम्प्यूटर मेमोरी में उत्पादित परिणाम, प्राप्त निर्देश, डाटा, सूचना अन्य सभी प्रकार के डाटा को विभिन्न रूपों में संचित किया जा सकता हैं.
  3. भंडारन क्षमता के कारण कम्प्यूटर कार्य की दोहराव से बच जाता हैं.

8. विश्वसनीय – Reliability

  1. यह एक भरोसेमंद और विश्वसनीय मशीन हैं.
  2. इसका जीवन लंबा होता हैं.
  3. इसके सहायक उपकरणों को आसानी से पलटा और रख-रखाव किया जा सकता हैं.

9. प्रकृति का दोस्त – Nature Friendly

  1. कम्प्यूटर अपना कार्य करने के लिए कागज का इस्तेमाल नहीं करता हैं.
  2. डाटा का भंडारण करने के लिए भी कागजी दस्तावेज नहीं बनाने पडते हैं.
  3. इसलिए कम्प्यूटर अप्रत्यक्ष रूप से प्रकृति के रक्षक होते हैं. और इससे लागत में भी कमी आती हैं.               


                                                     Thank you!

EXCEL SHORTCUT KEYS AND OUTLOOK SHORTCUT KEYS

EXCEL SHORTCUT KEYS


1.  F2                                                   edit the selected cell 

2.  F5                                                   go to a specific cell

3.  F7                                                   spell check selected text and or document

4.  F11                                                 create chart

5.  Ctrl + Shift + ;                                enter the current time 

6.  Ctrl + ;                                            enter the current date    

7.  Alt + Shift + F1                              insert new worksheet 

8.  Shift + F3                                       open the excel formula window 

9.  Shift +F5                                        bring up search box 

10. Ctrl + A                                         select all contents of worksheet 

11. Ctrl + B                                         bold highlighted selected

12. Ctrl + I                                          italicize highlighted selected 

13. Ctrl + C                                         copy selected text 

14. Ctrl + V                                         paste 

15. Ctrl + D                                         fill

16. Ctrl + K                                         insert link

17. Ctrl + F                                          open find and replace options

18. Ctrl + G                                          open go to options

19. Ctrl + H                                         open find and replace options 

20. Ctrl + U                                         underline highlighted selected 

21. Ctrl + Y                                          underline selected text

22. Ctrl + 5                                           strike through highlighted selection  

23. Ctrl + O                                          open options

24. Ctrl + N                                          open new document                                     

25. Ctrl + P                                           open print dialog box

26. Ctrl + S                                           save     

27. Ctrl + Z                                           undo last action

28. Ctrl + F9                                         minimize current window 

29. Ctrl + F10                                       maximize currently selected window 

30. Ctrl + F6                                         switch between open workbook/ windows  

31. Ctrl + Page up and                          move between excel worksheet in the same document

                Page down             

32. Ctrl + Tab                                       move between two or more open excel files

33. Alt + =                                            create formula to sum all of above cell

34. Ctrl + '                                            insert value of above cell into current cell    

35. Ctrl + Shift + !                               format number in common format 

36. Ctrl + Shift + $                              format number in  currency format 

37. Ctrl + Shift + #                              format number in  data format 

38. Ctrl + Shift + %                             format number in  percentage format 

39. Ctrl + Shift + ^                              format number in scientific format 

40. Ctrl + Shift +@                             format number in time format 

41. Ctrl +  →                                       move to next selection of text 

42. Ctrl + Space                                   select entire columns

43. Shift + Space                                 select entire row  

44. Ctrl + W                                         close document 


OUTLOOK SHORTCUT KEYS   


1.  Alt + S                                        send the email

2. Ctrl + C                                       copy selected text 

3. Ctrl + X                                       cut selected text 

4. Ctrl + P                                        open print dialog box

5. Ctrl + K                                       complete name/e mail typed in address bar

6. Ctrl + B                                       bold highlighted selection

7. Ctrl + I                                        italicize highlighted selection

8. Ctrl + U                                      underline highlighted selection   

9. Ctrl + R                                      reply to an email

10. Ctrl + F                                    forward an email

11. Ctrl + N                                    create a new email

12. Ctrl + Shift +  A                       create a new appointment to your calender

13. Ctrl + Shift + O                        open the outbox 

14. Ctrl + Shift + I                          open the inbox  

15. Ctrl + Shift +  K                        add a new task      

16. Ctrl + Shift + C                          create a new contact

17. Ctrl + Shift + J                           create a new journal entry


THANK YOU!


ad2

loading...